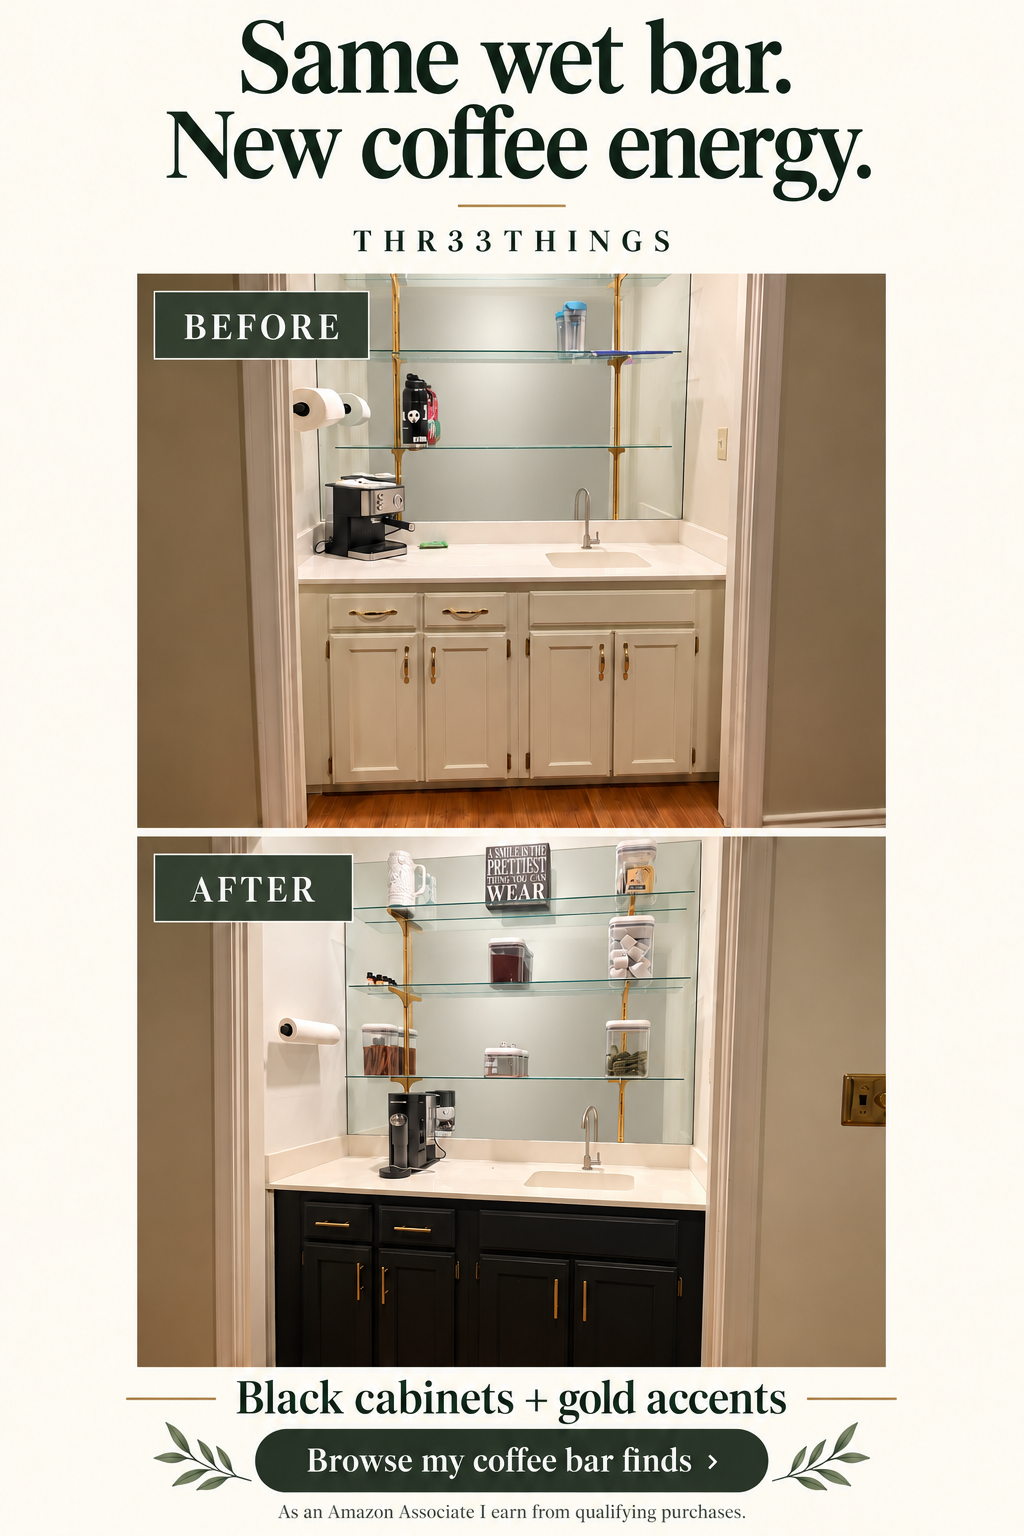
You know that 70s/80s wet-bar closet look: a recessed little nook, mirrored backing, glass shelves, and cabinets tucked into a closet-like opening. That was our starting point. The space had the bones of a useful coffee bar, but the whole setup still said "80s wet-bar closet."
We kept the cabinets and gave the space a different job: a coffee bar that felt more like us. This is our first-stage wet-bar closet conversion—an update to what was already there, with a bigger change to the opening still ahead.
The biggest visual change was painting the cabinets Peppercorn and swapping the handles for gold pulls. We also refinished the countertop, added a coffee maker and clear containers, and installed a bar sink and reverse-osmosis water system.
This was a three-day weekend project. The trick was working on the cabinets while the countertop coats dried. The epoxy had its own schedule. Apparently, it does not care how productive you feel.
Day 1: Clean, tape, and start painting
First, we used our cabinet prep cleaner on the cabinets and countertop. Then we taped off the areas we wanted to protect.
For the countertop, we applied primer before the epoxy countertop coating. My approach was one coat of primer when keeping the same color, or three when covering a darker color. That describes my approach to coverage; check the primer's label for your surface and application requirements. Our first coat of countertop epoxy went on that day.
While that dried, I painted the cabinets Peppercorn using cabinet paint, paintbrushes, and rollers. I finished two coats on the cabinets in one day.
The white paint used around our home is standard white semi-gloss. The Peppercorn cabinets and gold accents gave this little space the contrast I wanted.
Day 2: The second countertop coat and new handles
We waited 24 hours between our countertop epoxy coats, then applied the second coat on day two. The coating smelled strong during our project, so this was not a quick, odor-free paint job.
I also installed the gold cabinet handles, using a handle installation jig.
Keeping the existing cabinet doors and changing their color and hardware made the transformation visible without replacing the cabinetry.
Day 3: Sink, water system, and coffee setup
On the third day, my husband installed the bar sink and reverse-osmosis water system. That part took him about an hour and a half. That was our installation time; another setup may take longer.
Then came the coffee maker and clear storage containers. We kept the glass shelves and mirrored backing, giving the space a refresh while keeping much of what was already there.
What made the weekend work
We overlapped the work instead of waiting around between every step. Countertop drying time became cabinet-painting time. The second day was for the next countertop coat and hardware; the third was for the sink and water system.
The work fit into a long weekend. Completing the work and a coating reaching its full cure are different milestones: follow the exact product label for preparation, ventilation, recoating, and when the surface can handle water, heat, appliances, or everyday use. Our coat counts and 24-hour interval describe our project, not a rule for every product or surface.
Would I replace an entire cabinet setup before trying paint and new hardware? After seeing this change, I would start by looking at what I could keep.
What's next: opening the closet wall
We are still planning to open up the closet wall around the front of the wet bar. The coffee bar will stay recessed, but we want a more open front so it feels connected to the room instead of looking like an 80s closet turned wet bar.
The paint, countertop, and hardware got us through phase one. Opening that wall is the next part of the transformation—and we will share that update when it actually happens.
Photo note: Before-and-after photos show our actual space. Mirror reflections were digitally removed for privacy.